
Scanning the WiFi network can help you to detect possible connection interferences with other devices nearby used by your neighbors. Selecting a free channel can be the difference between a stable connection and not working internet. Fortunately, macOS offers a built-in tool.
macOS Catalina, Mac OS X Yosemite, macOS Sierra, Mac OS X El Capitan, and Mac OS X Mavericks are packed with a WiFi scanner that can be used to find the best WiFi channel for your wireless network. Apple has made the scanner a bit tricky to find hiding it in the Wireless Diagnostics app.
Run WiFi Scanner on macOS
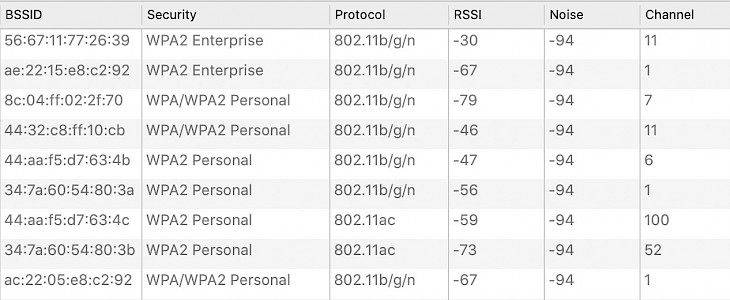
Wireless Diagnostics Scan analyzes nearby networks and provides information about network name, BSSID, security and protocol used, RSSI, noise, channels, band, width, and country.
Step 1. Activate Spotlight Search by clicking ⌘ Command + Space.
Step 2. Type Wireless Diagnostics.
Step 3. Open the app.
Step 4. Click ⌘ Command + ⌥ Option + 4 to run the Scan module.

Step 5. Open “Scan” Window to find all WiFi networks.
After opening up the Scan window, you’ll find a summary of all wireless networks in range. On the left pane, you’ll find a breakdown of the wireless channels you’re currently using, and the recommended channels you should be using. On the right side, there are informations about scanned WiFi networks.

The best practice is to select not used channels for your WiFi. Log into the router via web browser and adjust the wireless channel. Restart the router and you should have a more stable connection.