
Ever wanted to start vlogging or create content for social media? It is easier than ever with a variety of video editing software in the market specifically for vloggers.
Today we will be reviewing VideoProc Vlogger and share our insights on this software, it’s features, use cases, why should one invest in this tool, and more.
What is VideoProc Vlogger?
VideoProc Vlogger is a , so you don’t have to worry about your budget. You can download it for free from their website available for both windows and mac.
Even though the name has vlogger in it’s name but you can use it for any video content apart from vlogging. The good thing about this software is that it does not have any features locked, no limit on video length on your output video and it doesn’t add a watermark to your videos. All the features of this tool are available to you from the beginning.
With a wide variety of free video editing software in the market, what makes VideoProc stand in the crowd?
- Modern Interface
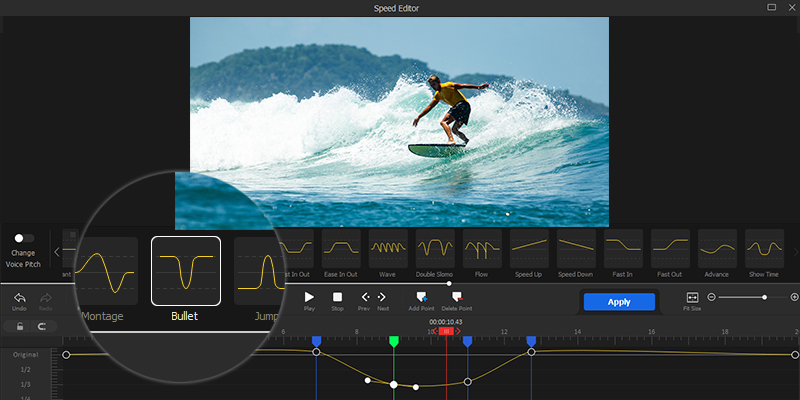
- Speed Editor
- User Friendly and Easy to Use Tool for Beginners
- Organized and Labelled Timelines
- Media Library, Transitions, and Effect Panels are included
- Responsive video template from the mobile device to 4k resolution.
- Record Voiceover directly in the software
- No Watermark
- No limit on Video Length
Minimum System Configuration
OS: Microsoft Windows 7 and above (64 bit) OR Mac OS X 10.11 & above
RAM: 1 GB or above
CPU: 2 GHz or above (Intel or AMD)
Hard Drive: Free space of 600MB for installation.
What does editing with VideoProc Vlogger Free Video Editing Software look like:
Adding Media
You can add your video files to the media library, you can either drag and drop or select the video from your folders and upload it to VideoProc Library.
In Media Library you will be able to:
- Add Video
- Add Images
- Add Music
- Add Title
- Add Subtitles
Editing Functions
Users also get functions for undo, redo, and delete options which will help them to experiment with the video without worrying about whether they can go back to the last edit or not.
Option users get for Editing Functions:
- Split
- Split All
- Ripple Edit
- Speed
- Crop
- Motion
Colour Grading
Users can change Exposure, Contrast, and Saturation. If you want to change further, you can select more options in the color filter which will allow you to edit highlights, shadow, whites, blacks, lut intensity, and a wide range of color filters for the editor’s need.
Audio Processing
There is the option for users to detach audio from their uploaded video. You can select the audio file and drag it to the audio segment which will help you to edit audio on a separate file in the same timeline.
If the sound of your audio is low, you can increase the volume of that file using an audio icon. In the audio icon, you can
- Increase & decrease the volume
- Fade in & Fade Out
- Mute
- Use Equalizer presets
- Add Effects to audio

Text & Titles
You can add text to your video by selecting the place where you want to add text and clicking the Text icon and start adding Title, and Subtitles to your video, you can choose the font, increase size, change color, fade it and move out options. You can add text from your media library.
Effects
You have an option for effects that will help you to add effects to the video, you can add as many effects as you want in your video which will help you add an extra layer to your video to make it interactive and engaging.
There are tons of effects which is pre-included in the software, you can add start time and end time on those effects as well.
Record your own voice
In case you don’t want to audio from the video or you just want to add your voice to the video, you can use the record icon and start recording your voice for that video which works for both external and internal microphones.
Export
Now when you are ready with everything, it is time to export your work.
To export just click the export icon, you can name the file, the tool will ask where you want to save your video in your system, and also ask you in what format you want the video. And it will give you an output detail like video resolution, duration of the video, and size of the video which will help you to understand, what video you will be getting. Apart from that, you also have the control to export it to different qualities (low, medium, high), you can change the video code, fps, bitrate, and more in the audio setting.
Here in this video, you can see how to create BADASS effects with transition presets in VideoProc Vlogger


