
Privacy is very important in today’s world as there are hackers all around trying to steal your data. An easy way to keep your network secure is by using a private WiFi address that will not let your iPhone, iPad, Apple Watch, etc. get tracked when using different networks. In this article, we will teach you how you can turn on private WiFi address on your devices to protect your privacy.
What is a WiFi Address?
One of the best things about Apple devices is that you can set a different MAC address for the wireless networks on your iPhone, iPad, and Apple Watch. However, this feature is only available with the new update of iOS 14, iPadOS 14, and watchOS 7. As a result, your activity isn’t tracked anymore which means better online privacy. Since the new fake MAC address doesn’t give any information such as the device name, type, brand, etc. to the network, it reduces the chances of your device getting hacked into.
Although this does mean that every time you reach your home network, it will consider your device as a new device. It does offer you privacy in public. Moreover, you can change the WiFi settings to enable and disable the private addresses.

How can you use a WiFi Address
To enable and manage private WiFi addresses and randomize your MAC addresses, you need to simply follow the below-mentioned steps. Do remember that you will need to perform this setting for every wireless network manually.
For iPhone and iPad Users
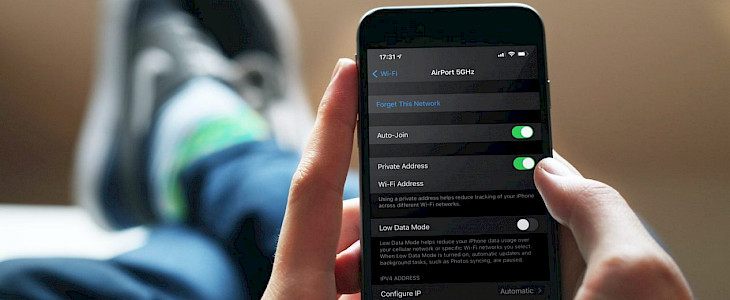
To start using a randomized MAC address in place of the actual MAC address on your iPhone and iPad, you need to turn on the toggle for ‘Private addresses’ in your WiFi settings.
- Click on Settings on your iPad or Phone and select the WiFi option.
- Select the name of the network that you just joined in and enable the ‘Private Address’ toggle to launch this feature.
Now, you need to connect to the WiFi as you normally do. To disable it, you just need to turn the switch to the OFF position. If your device is still connected to a wireless network, it will give you a privacy warning.
For Apple Watch Users
Similarly, for Apple Watch, you need to turn the ‘Private Address’ switch to the ON position in your WiFi settings.
- Touch the Digital Crown of your Apple Watch and then head to the Settings app.
- Now, select the WiFi option from the list.
- Click on the ‘i’ icon of the network you just joined and enable the feature by toggling ‘Private Address’ switch to ON. Now, connect to the WiFi.

You can disable the feature by sliding the ‘Private Address’ switch to the OFF position.
Problems associated with private WiFi Addresses
A few routers can be configured to let you know if any new devices have joined the network. This feature will let you know if a stranger or a neighbor is trying to connect to your wireless network. So, when you turn on the private address feature, your device is also considered as a new device and you will be notified about the same when you trying to connect to the network.
Apple advises the customers to keep this setting on for all networks. However, some routers or network configurations might not support this setting and won’t give you Internet access to a private address. If your WiFi settings display no network, then switch on Airplane mode and then disable it after a few seconds. If this doesn’t fix the problem, then turn off the private address feature when using that network.


