Cydia Impactor is one of the most popular apps to sign IPA files and sideload them on iOS devices. In order to install the signed app to your device, you can also try free iOS App Signer for IPA, APP, DEB, and xcarchive packages. The software is available for macOS only but now you can also use a cloud-based service.
Download
Download iOS App Signer v1.13.1
What is iOS App Signer?
iOS App Signer is a free Mac application to sign IPA, DEB, APP, xcarchive packages and sideload them on your iPhone, iPad, iPod Touch. (Re)sign apps and bundle them into IPA files that are ready to be installed on an iOS device. To make the app work the latest version of Xcode is required to be installed on your Mac.
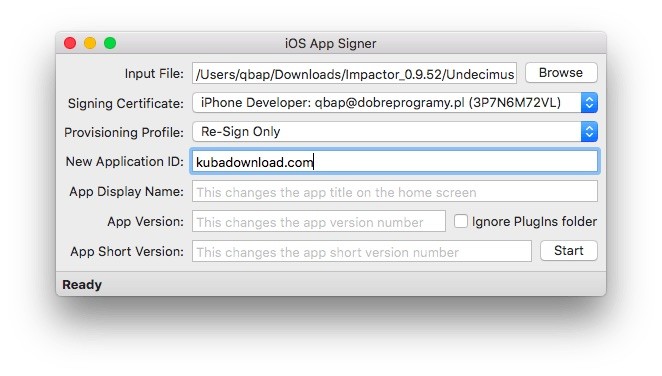
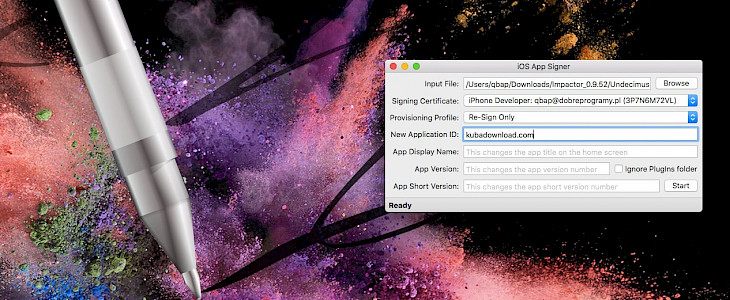
You need a provisioning profile and signing certificate, from a new Xcode project. Open iOS App Signer and select the input file, signing certificate, provisioning file, and optionally specify a new application ID, and/or application display name.
Recently, the developer is experimenting with a new cloud-based version of iOS App Signer that doesn't require a Mac or any computer at all. This service isn't availabkle for free and it does require a paid registration to work. To sign apps online, you're going to need the Platinum option from UDID Registrations.
Alternatively, you can purchase the Silver or Gold package to get a signing certificate and provisioning profile that you can use with iOS App Signer on Mac.
How to sign IPA files with iOS App Signer and Xcode
On the developer website, you can find a detailed tutorial on how to install IPA files using this method. Daniel Radtke provides also screenshots for every step to sideload apps with iOS App Signer and Xcode (if you are not familiar with the IDE).
Step 1. Install Xcode, open it, and agree to the license agreement.
Step 2. Plugin your iOS device and select it as the build target.
Step 3. Open Xcode and create a new iOS Application.
Step 4. Type a name and identifier.
Step 5. Xcode will complain about the lack of a provisioning profile. Click fix issue.
Step 6. Sign in to an Apple ID when prompted.
Step 7. Download iOS App Signer.
Step 8. Download any IPA file you like to install on the device.
Step 9. Open iOS App Signer.
Step 10. Select the IPA you just downloaded as an input file
Step 11. Click start.
Step 12. Return to Xcode. Go to the menu bar. Click Window → Devices.
Step 13. Find your device, click the plus, and select the file created by iOS App Signer.
Changelog
Version 1.13.1
- Bug Fix: pass the required full path to checkMachOFile instead of just the file name
- Revert commit 73f30c6, this was causing some incorrect entitlement IDs
Version 1.13
- Add the option to skip the plugins folder, this allows for separate signatures for extensions and the main app.
Version 1.12
- Fix a regression caused by a missing mach-o file magic
Version 1.11
- The development certificate is kept consistent with the entitlements.plist file generated by xcode when it is packaged, so that it cannot be debugged after re-signing.
- add IpaSecurityRestriction dylib signing support
- fix bug: signer uses Dynamic framework can't upload to the app store
- match mach-o files by content instead of extension
- add distinct mobileprovision in list
Version 1.10
- Support for the new deb format
- Some fixes for high sierra
Version 1.9
- A couple of bug fixes
- Check if the required Xcode command line tools are installed before continuing
- Add support to change the displayed app version number