
Many people on their iPhones look for ways in which they can change their Apple IDs' Country or Region. There can be many reasons behind it. The purpose being a personal choice, there is a way through which this can be achieved. However, it is essential to understand that ever the reason might be, it should not be illegitimate.
In this reading, an attempt has been made to elaborate on how people can now change their Apple ID Country/ Region on iPhone & iPad by simply following a series of simple steps. Follow this article if you have been looking for answers on the same.
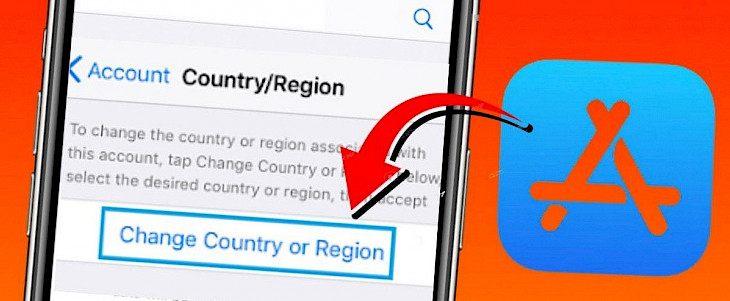
How can you change Apple ID Country/ Region on iPhone & iPad?
Before you update the location, the store credit should be spent, and subscriptions should be canceled. If you are shifting to an altogether new location, then it's better to find a new payment method that works in the country or region. Next, you will only need to follow a series of steps to change your iPhone, iPad, or iPad touches region.
Here are few steps that should work for you:
- Navigate to settings application your phone
- Then tap your name and then on media and purchases.
- Tap to view the Account, and sign in if you are asked to.
- Next tap on country/region
- Click on change country or region. Select the new country or region and then review the terms and conditions.
- Click on Agree in the upper-right corner and then agree again to confirm.
- Then select a refund method and enter your new payment information and billing address. Select next, and then enter a valid payment method for a new country or region.
How to change country/ region using a laptop?
Similarly, one can also change country and region settings on the computer if they wish to. All you need to do again is following series of simple steps.
- Open the Music application or iTunes.
- At the menu bar at the top of the screen or the beginning of the iTunes window, click Account and then click view my Account.
- Sign using your Apple ID, and then on the account information page, click on change country or region.
- Next, select another new country or region and review all the terms and conditions properly. Then click on agree. Click Agree again to confirm.
- Enter your new payment data and billing address, then click on continue.
How to change the region online?
Well, the steps to change region online is pretty much simple as that of country. Some of the actions that can be followed are:
- Sign in with your Apple ID account page
- Scroll to the Account section and then click on Edit.
- From the country/region menu, select a new country or region.
- Follow the onscreen instructions and enter a valid payment method for your new country or region.
Conclusion:
Changing region and country settings on Apple is relatively easy. Just follow the series of steps mentioned above and change your settings whenever you want to.


