
In CE region (European Union) by default, there is no option to activate the Custom channel mode in Image Transmission Settings inside DJI GO 4 App. The Channel button remains greyed out without the option to change the settings manually. Discover how to enable custom channel mode in DJI GO 4.
To activate the custom channel mode in DJI GO 4 App it's required to change the region on your iPhone or iPad. Navigate to General → Language & Region → Region and select United States. This setting will change also regional format including time, numbers, calendar date format, etc.

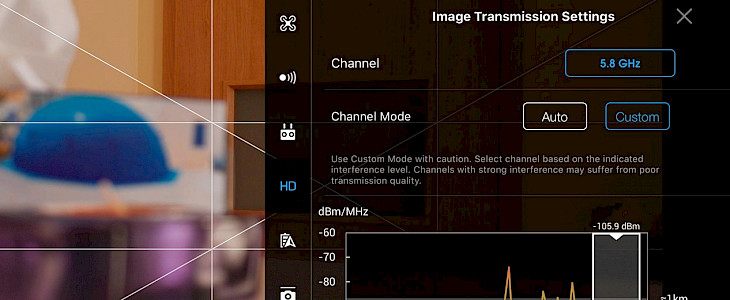
After you will activate this option DJI GO 4 App will enable the Custom button available in Image Transmission Settings. Now you can drag the dBm/MHz bar to any position.
Use Custom Mode with caution. Select channel based on the indicated interference level. Channels with strong interferences may suffer from poor transmission quality. Choose a channel with a weak interference to maximize signal quality. For instance, the 10M Channel is generally low interference.

Moreover, you can also switch downlink bandwidth from 20 MHz to 10 MHz. DJI GO 4 app works great in Auto mode but if you like to have full control over the selected channel you can change it manually (also in CE region) on your DJI drone like Mavic Pro, Mavic 2 Pro, Spark, Mavic Air, etc.
Channel mode should stay in the default Dual option. 5.8 GHz frequency is used to send better and faster transmissions on short distances, and 2.4 GHz works much better on longer distances. DJI GO 4 App switches between the two frequencies automatically based on the transmission quality.
If you plane your flights you can force the DJI GO 4 App to use specific frequency to avoid problems with data transmissions. For long flights use more stable 2.4 GHz frequency allowing you to send data on longer distances. 5.8 GHz works better on smaller distances with a lot of interference.