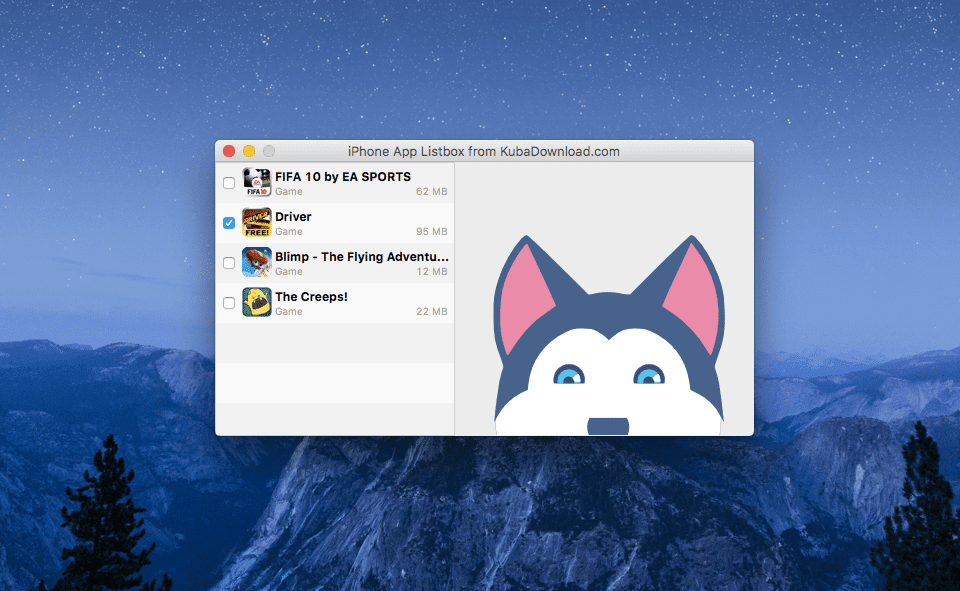
Xojo is an object-oriented cross-platform development tool using Visual Basic language to create apps for the Desktop, Web, iOS and Raspberry Pi. In this tutorial I will show you how to create a custom look for ListBox component. Let's start and run Xojo IDE.
The ListBox component that we will create was inspired by iTunes list displaying installed apps on iOS devices. After running Xojo IDE create Desktop project and go to Window Editor. Next drag and drop from the Library ListBox component on our application Window. Its name will be Listbox1. Set it DefaultRowHeight property to 40.
Create for Listbox1 CallBacgroundPaint EventHandler. You can do it in few ways. First, select the Listbox1 component. For the purpose of this tutorial, we will use menu Insert -> Event Handler -> CallBacgroundPaint. Now add the code below. The result will be two grey colors drown to the list to make it more interesting.
if row mod 2 = 0 then
  g.ForeColor = RGB(239,239,239)
else
  g.ForeColor = RGB(247,247,247)
end if
g.FillRect 0,0, g.Width, g.Height
Now, let's add some cells to our Listbox component. We use this EventHandler called Open. It will display 4 positions when the application will open. As in the example above using the Insert menu to do it and pestle the code to the open handler.
ListBox1.AddFolder "FIFA 10 by EA SPORTS"
ListBox1.Cell(Me.LastIndex, 1) = "F"
Listbox1.Cell(Listbox1.LastIndex, 2) = "Game"
Listbox1.Cell(Listbox1.LastIndex, 3) = "62 MB"

ListBox1.AddFolder "Driver"
ListBox1.Cell(Me.LastIndex, 1) = "D"
Listbox1.Cell(Listbox1.LastIndex, 2) = "Game"
Listbox1.Cell(Listbox1.LastIndex, 3) = "95 MB"

ListBox1.AddFolder "Blimp - The Flying Adventures"
ListBox1.Cell(Me.LastIndex, 1) = "B"
Listbox1.Cell(Listbox1.LastIndex, 2) = "Game"
Listbox1.Cell(Listbox1.LastIndex, 3) = "12 MB"

ListBox1.AddFolder "The Creeps!"
ListBox1.Cell(Me.LastIndex, 1) = "T"
Listbox1.Cell(Listbox1.LastIndex, 2) = "Game"
Listbox1.Cell(Listbox1.LastIndex, 3) = "22 MB"

me.ColumnAlignmentOffset(0)= 35 //set the offset position to 35

me.ColumnType(0) = ListBox1.TypeCheckBox //add checkbox to every Listbox item
When you will run our application you will see that it doesn't look like you expect. We will fix it in our next step. Create CellTextPaint EventHandler for Listbox. Next, we will write how the cells should be painted on our Listbox component. There are some icons in our project file available in folder images (30px x 30px) named game1, game2, game3, game4.
//displaying the icons

if column = 0 then
  if Me.cell(row,1) = "F" then
    g.DrawPicture(game4,2,4)
  elseif Me.cell(row,1) = "D" then
    g.DrawPicture(game3,2,4)
  elseif Me.Cell(row,1) = "B" then
    g.DrawPicture(game1,2,4)
  elseif Me.Cell(row,1) = "T" then
    g.DrawPicture(game2,2,4)
  end if
end if

if column = 0 then

  g.Bold = true
  g.TextSize = 12

  g.DrawString me.Cell(row, 0), x, 18, g.Width - x, true

  g.Bold = false
  g.ForeColor = &c929292
  g.TextSize = 10

  Dim type As String = me.Cell(row, 2)
  Dim size As String = me.Cell(row, 3)

  g.DrawString (type, x, 32, g.width - x, false)
  g.DrawString (size, me.Width - 64, 32, g.width - x, false)

  return true
end
Now when you run our application build using Xojo IDE you will see our designed Listbox that can be used for presenting any data you need. This is just a quick example of how can you use this powerful component to create custom build lists in Xojo IDE. Hope you enjoyed this tutorial!


