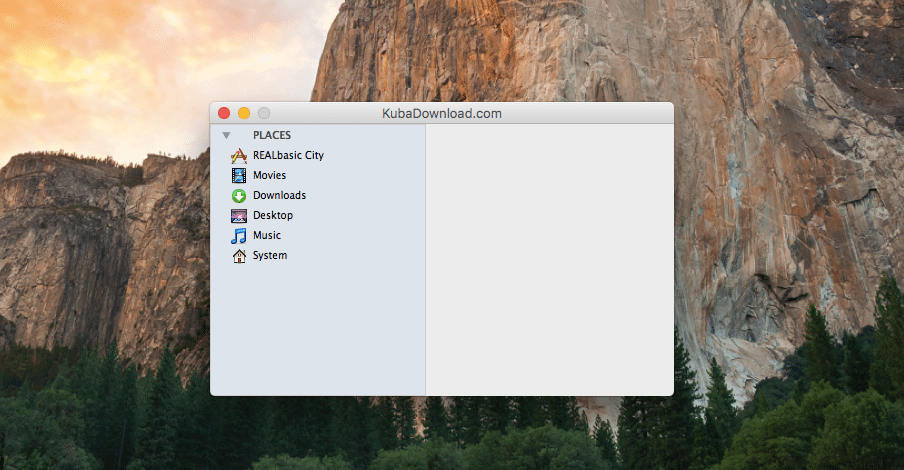
Xojo is a fun to use IDE allowing you to create multi-platfrom applications using VisualBasic language. In this tutorial we will create a Finder like Sidebar in Xojo IDE using ListBox component. As always, it is really easy to achieve this kind of effect. Let's start coding!
Before we will start I like to recommend you to check my previous tutorial Create custom look for Listbox component in Xojo IDE to see quite different style that can be created using the same ListBox component. We will use also the technics from previous tutorial to create different, but still interesting look. This time we will try something new - Methods to hide and show the list.
First we need to drag and drop to Window a Listbox1 control from Xojo Library. Create for Listbox1 CellBackgroundPaint EventHandler. You can do it on few ways. First select the Listbox1 component. For purpose of this tutorial we will use menu Insert -> Event Handler -> CellBackgroundPaint. Now copy the code below.
g.ForeColor = RGB(214,221,229)
//Finder Sidebar background color
g.FillRect (0,0,g.Width,g.Height)

if me.Selected(row) and row > 0 then gradient(g)
//if selected row is different than 0 (PLACES) then draw gradient select

return true //draw it
Now we will create Property named showlist. Change it Type to Boolean and Default value to true. You can do it using the Inspector. This property will store the value if our list is open or closed. Next step is CellTextPain EventHandler for Listbox1 control. Use this code to draw pictures next to text and an arrow next to Places.
if column = 0 then
  if Me.cell(row,1) = "R" then
    g.DrawPicture(Applications,15,2)
  elseif Me.cell(row,1) = "M" then
    g.DrawPicture(Movies,15,2)
  elseif Me.Cell(row,1) = "D" then
    g.DrawPicture(Downloads,15,2)
  elseif Me.Cell(row,1) = "De" then
    g.DrawPicture(Desktop,15,2)
  elseif Me.Cell(row,1) = "Mu" then
    g.DrawPicture(Music,15,2)
  elseif Me.Cell(row,1) = "S" then
    g.DrawPicture(System1,15,2)
  end if
end if


if showlist = true and row = 0 then

  g.Bold = true
  g.foreColor = rgb(60,60,60)
  g.DrawPicture(Arrow01,2,2)

elseif row = 0 then

  g.Bold = true
  g.foreColor = rgb(60,60,60)
  g.DrawPicture(Arrow02,2,2)

end if

//not needed but you can use it to take action clicking specific link

if Me.Selected(row) and row = 1 then
//if selected row and row number is 1 (REALbasic City) then
  Window1.Title = Me.list(row)
//change the Window title text to row text
elseif Me.Selected(row) and row = 2 then
//if selected row and row number is (Movies) then
  Window1.Title = Me.list(row)
//change the Window title text to row text
end if
Let's add 3 Methods to show places, hide places and generate blue gradient when selecting our position. We need to select from menu Insert -> Method and name it gradient. Then copy the code below to it.
Dim i As integer, ratio, endratio As Double
Dim StartColor, EndColor, TopColor As Color

// Pick our colors
if Listbox1.Active = false or Listbox1.Enabled = false then
  StartColor = RGB(168, 168, 168)
  EndColor = RGB(121, 121, 121)
  TopColor = RGB(145, 145, 145)
else
  StartColor = RGB(80, 171, 233)
  EndColor = RGB(0, 117, 215)
  TopColor = RGB(15, 145, 224)
end if

// Draw the gradient
for i = 0 to g.Height

  // Determine the current line's color
  ratio = ((g.Height-i)/g.Height)
  endratio = (i/g.Height)
  g.ForeColor = RGB(EndColor.Red * endratio + StartColor.Red * ratio,
EndColor.Green * endratio + StartColor.Green * ratio, EndColor.Blue * endratio + StartColor.Blue * ratio)

  // Draw the step
  g.DrawLine 0, i, g.Width, i
next

g.ForeColor = TopColor
g.DrawLine 0, 0, g.Width, 0
Two methods to go. We will display the list of all Places when they are open. Create new Method and name it showplaces and use the code to add rows with our positions.
Dim i As Integer

Listbox1.DeleteAllRows

Listbox1.AddRow "PLACES"

ListBox1.AddRow "REALbasic City"
ListBox1.Cell(1, 1) = "R"

ListBox1.AddRow "Movies"
ListBox1.Cell(2, 1) = "M" //Me.LastIndex

ListBox1.AddRow "Downloads"
ListBox1.Cell(3, 1) = "D" //Me.LastIndex

ListBox1.AddRow "Desktop"
ListBox1.Cell(4, 1) = "De" //Me.LastIndex

ListBox1.AddRow "Music"
ListBox1.Cell(5, 1) = "Mu" //Me.LastIndex

ListBox1.AddRow "System"
ListBox1.Cell(6, 1) = "S" //Me.LastIndex

Listbox1.ColumnAlignmentOffset(0)= 38
We will create the last Method that will do the opposite and will hide (close) all Places. Name it hideplaces and use our code.
Dim g As Graphics

Listbox1.DeleteAllRows
Listbox1.AddRow "PLACES"
Let's make a use from our Methods and create DoubleClick EventHandler for Listbox1 control.
if Listbox1.Selected(0) and showlist = true then
  hideplaces //this will work after we add a Method
  showlist = false
elseif showlist = false then
  showplaces  //this will work after we add a Method
  showlist = true
end
To finish we will also add a new Open EventHandler to Listbox1 component and add a short code to it. Select Listbox1 and add from menu Insert -> Event Handler -> Open.
showplaces
ListBox1.CellState(1,0)=Checkbox.CheckedStates.Checked
The final result should look like on picture below. If you have any questions or tutorial requests please leave a comment and I will replay to help. Hope you enjoyed this tutorial and see you next time!


