Checkra1n Linux was released! This is great news for all jailbreak community running on iOS 12, iOS 13, and iOS 14. It took some time but finally, Checkra1n Linux jailbreak tool is available for the free open-source system. Download Checkra1n for Linux and learn how to jailbreak iPhone, iPod, and iPad Touch.
Content Summary
What is Checkra1n Linux?
Checkra1n is an ultimate jailbreak tool with support for most generations of iOS devices starting from iPhone 4S (A5 chip) to iPhone 8 and iPhone X (A11 chip). All of the devices mentioned are jailbreakable for their entire lifetime. This means every present iOS version and versions that will come in the future.
All A5 to A11 devices are compatible with checkra1n Linux. Only the latest devices including iPhone 11 Pro, iPhone 11, iPhone 11 Pro Max, iPhone XR, iPhone XS Max, iPhone XS, and iPhone XS Max are not compatible with checkra1n Linux. Install Cydia app on the latest iOS 13 to iOS 14.

Checkra1n 0.9.8 beta was the first version allowing you to jailbreak iOS 12, iOS 13, and iOS 14 on Linux. Checkra1n Team released a CLI version (no GUI) for x86_64, arm, arm64, and i486 architectures that can but executed from terminal. It is really easy to use the jailbreak tool from the command line.
iOS 14 can be jailbroken only on the following devices:
- iPhone 6s, 6s Plus, and SE
- iPad 5th generation
- iPad Air 2
- iPad mini 4
- iPad Pro 1st generation
- Apple TV 4 and 4K
- iBridge T2
Download checra1n for Linux
- Download for Linux (CLI, x86_64)
- Download for Linux (CLI, arm)
- Download for Linux (CLI, arm64)
- Download for Linux (CLI, i486)
To check your system architecture type in the terminal
uname -a
Linux kubadownload-com 4.15.0-76-generic #86-Ubuntu SMP Fri Jan 17 17:24:28 UTC 2020 x86_64 x86_64 x86_64 GNU/LinuxHow toinstall Checkra1n on Linux
Now when Checkra1n jailbreak tool is available also for Linux users you can freely jailbreak all supported Apple devices running on iOS 12 and iOS 13 firmware.
1. Download checkra1n.dms on your computer.
2. Right-click on the checkra1n.dms file and select Properties.
3. Switch to Permission Tab.

4. Activate "Allow executing file as program" or use the command option
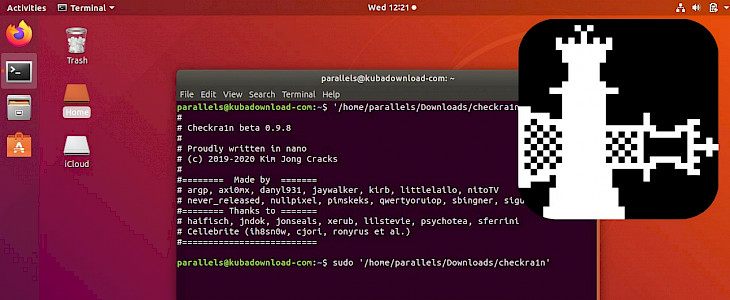
sudo chmod +x '/home/kuba/Download/checkra1n'5. Open terminal app.
6. Run command as root and provide your password to open the jailbreak tool.
sudo '/home/kuba/Downloads/checkra1n'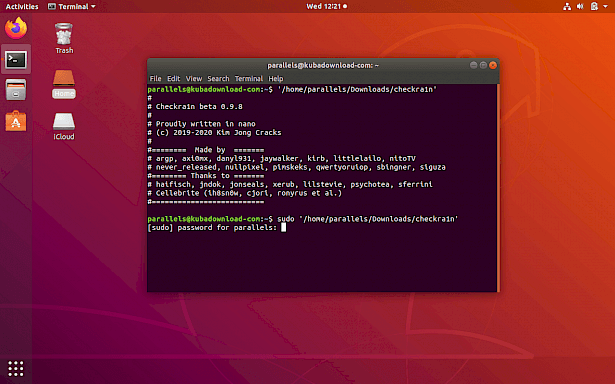
7. Connect your iPhone to PC or Mac using USB cable.
8. Select "Start" to jailbreak your device.
9. checkra1n will activate Recovery Mode.
10. Enter DFU mode (screen must stay black) on your iDevice.
Enter DFU Mode before jailbreak:
- Keep iDevice in Normal Mode or Recovery Mode, plug USB cable (please don't use USB extension cable)
- Hold HOME button (iPhone7/7p hold Volume Down button instead), then hold POWER button until the screen is blank
- Release the POWER button after about 10 seconds, but keep holding the HOME button (iPhone7/7p hold Volume Down button instead) for about 5 seconds
iPhone8, iPhone8 Plus Steps to enter DFU Mode:
- Plug an original USB cable, quick-press Volume "+" button, then Volume "-" button and hold the Power button.
- When the iDevice turns off, hold the Volume "-" button, then release the Power button after 5 seconds, until it prompts "succeded".
11. Wait till the device will boot into jailbreak mode.
12. Lunch checkra1n loader from home screen.
13. Install Cydia tweaks on your iPhone.
Terminal commands
Usage: sudo '/home/kuba/Download/checkra1n' [OPTIONS]

Options:
  --version                          Print version
  -c, --cli                          Force command line
  -d, --demote                       Demote
  -e, --extra-bootargs <BOOTARGS>    Set extra bootargs
  -g, --gui                          Start a graphical user interface
  -l, --log-path <FILE PATH>         Log to file
  -n, --no-colors                    Disable colors on the command line
  -p, --pongo                        Boots to a Pongo shell
  -s, --safe-mode                    Enter Safe-Mode
  -t, --tui                          Start a terminal graphical user interface
  -V, --verbose-boot                 Verbose Boot
  -v, --verbose-logging              Verbose logging
  -w, --wui <IPV4> <PORT>            Start webra1n - a web based user interface
How to remove checkra1n jailbreak
The latest version of checkra1n Linux app allows you to easily remove the jailbreak from your device. checkra1n loaders installed on your iOS device allows you to install Cydia. Besides that, there is also an option to Restore system. When you click on this option you will uninstall jailbreak files and other changes made to the operating system, without erasing data. This will reboot iPhone.

Upgrade to newest iOS
The safest way to update iOS on jailbroken devices is to restore the system to the state before you have jailbroken your device in the first place. This option is available via Loader app (the same you used to install Cydia) available from home screen. It is also important to save all tweaks and settings on checkra1n jailbreak to restore them after re-jailbreaking the upgraded iOS version.
1. Install Batchomatic tweak to save all tweaks, apps, and settings.
2. Generate a .deb file with iOS jailbreak configurations.
3. Save the .deb file on any Cloud service.
4. Open the Loader app and tap Restore System.
5. Navigate to System → General → Software Update.
6. Update iOS to the newest version.
7. Jailbreak your device using checkra1n.
8. Move the .deb file on your device and install it using Filza.
Disable revokes on checkra1n jailbreak
If you decide to jailbreak your device with a tool like checkra1n Linux it is possible to disable revokes for all apps installed from 3uTools, and even 3rd party AppStores like AppValley, PandaHelper, and others. Please be informed that some apps doesn't work on jailbroken system like iSpoofer.
1. Open the Cydia app on your device.
2. Tap Sources → Edit → Add the kiiimo Repository.
3. Switch to Search Tab and type Anti-Revoke 2.
4. Tap the Install button.
5. Respring your device.
All apps installed on Anti-Revoke 2 hack will work until you restart your device. The jailbreak state will be lost, so it's required to re-jailbreak your device. This solution was tested on iOS 12, iOS 13, and iOS 14.